
High-Velocity HVAC System
Before installing an advanced HVAC system, it’s crucial to understand the concept behind the high-velocity HVAC device and the method by which it works.
It’s essentially a duct which is a tiny and fast airflow cooling and heating system designed to provide a proper flow of air into each space during the winter and summer seasons.
The system comes with 2″ of inner diameter tubing which supports a wall in order to prevent obstructions.
Because of its effectiveness, It is the choice of many homeowners for the HVAC system. However, many homeowners do not know how to put it in place.
Are you trying to figure out how to install a high-velocity HVAC system? Be on the lookout for your next step to answer any questions.
How to install a high-velocity HVAC system?
Below are some steps that you have to follow to establish a successful HVAC unit for your home:
1. Choose a suitable place for the fan unit
This is the initial step of installing a high-speed or extremely high-velocity HVAC system.
The first step is to put up the fan coil in an area that is not heated.
For instance, places such as an attic, garage, or crawlspace are suitable because they are protected from the weather.
In addition, you can put fans in climate-controlled spaces, such as the basement, the utility room, or even the closet.
It is also essential to inspect the air duct, as well as locate the box for air filters. Also, note the position of the air supply tube as well as condensate drain lines that are 9 inches in diameter inside the diameter of the plenum along with condensate and refrigerant lines.
2. Lower to Return Air Opening:
It may be beneficial by cutting the hole in return air and selecting the ideal location for an air return pipe.
Don’t put in the air return boxes within your bedrooms until you are in the location of putting in the air duct which has a bend of 180 degrees.
After cutting the opening for return air, it is simple to pass through the coil.
Take note the return air container was specifically made to fit between units measuring 16 inches in length and fourteen inches across.
If you’re using an independent vertical fan coil be sure that the opening is large enough that it can accommodate 90-degree bends inside the conduit for return.
Don’t install the box to return it after you’ve completed the installation procedure. While installing you can put items in an airline that is connected to the back.
3. Develop an online marketplace
Based on the dimensions of your fan coil unit.
Based on the dimensions of the fan coil unit You can construct a simple platform. We recommend using a minimum of 2-by-8-inch-studs, with at least 1/2-inch of plywood to build the platform.
To maximize performance, make use of the isolation strips. Never put an untied rod directly to an existing fan coil’s frame.
4. The Supply Plenum Ring
It’s just a couple of inches less than the lower part of the coil unit.
This means you’ll need to move the coil unit to make room for the ring for the plenum.
It is then ideal to connect the ring for the plenum to the opening of the square.
Be sure that you have connected the plenum’s rings to the fan coil unit then connect the plenum Ring.
5. Connect the Condensate Drain to the main drain.
If you’ve completed all four steps above, now’s the right time for you to join the drain on condensate on your appliance.
So, you must use local codes. It is important to keep your condensate drainage line to ensure you have a drain that is suitable.
Be sure that the drain line is empty 1/4 inch per foot.
6. Attach Refrigerant Lines:
It is crucial to connect the refrigerant appliance to the coil inside it, which is situated from the condensing unit to the outside.
7. Be sure to attach the Plenum Duct properly to the Supply Tubing
If you are installing the air distribution elements line with the sizing factors create the outline of your system.
When you’re working on building the HVAC device, you remove the plus side portion of the front segment.
The next step you need to do is to insert the pipe into the coil’s collar on your fans. In order to create an elongated duct, you must move the plenum conduit to the left.
Additionally, you’ll need the installation of flat headspins. Make sure the insulator has been placed in the unit of your fan.
Once you have installed the plenum duct attach the cap to the plenum’s side to ensure that it is in the right location.
It is suggested to connect the pins using a flat head and connect them to sheets of metal with tabs.
8. Installing Sound Attenuation Tubing
Determine where you’d like to put the room’s endpoint.
If you want to put the terminator in an area that’s an area of celling, it must be at least five inches away from the wall’s edge.
To connect the outlet, it’s required to drill a one-inch hole.
Also, you should keep 3 inches around your hole, which is 1/8 inch. Also, you should attach the room’s terminator to tubing that is able to block the sound.
If you’re placing the terminator on the floor, you should make a one-inch screen and then change the position of the terminator inside the tubing connector, as well as the faceplate.
9. Set-up Supply Tubing
Furthermore, you’ll have been able to join the tube to its appropriate length and lengths in a thorough manner.
Remember that lengths of tubing should be 30 feet, and the minimum length should be 6 feet.
After that, you are able to put in the supply of tubing. For the securement of the two parts then, you can place the adhesive tape over the connector.
You can then make use of the action twist method to join the connectors.
Once you’ve successfully completed your supply-run installation
- Install the air return duct and also the airbox.
- Remove the return airbag, and remove them from each other.
- The return air box must be put inside the opening to return air that was cut before.
- Then, you are able to insert your return grill into the box.
After that, you’ll need to connect every part of the return air conduit with the fan’s, slanting slant end.
10. Electrical Connections
It is the next thing to do connecting the thermostat that is low voltage to the control block to provide low voltage.
Be sure to ensure that, the thermostat is operating properly electrical service is required by the power supply of 208/230/60/1.
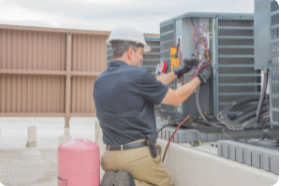
As you can imagine that installing a very fast or high-velocity HVAC system isn’t an easy job.
If you choose to do it yourself and do it yourself, there’s a good likelihood that you’ll do damage to yourself.
Therefore, if you plan to install an efficient HVAC system, it is recommended to use or hire Haslet Best AC and Heating Repair LLC, an experienced HVAC repairs, maintenance, and installation company that will handle the high-velocity HVAC system that is installed for you.
You could as well google search by typing HVAC company near me to reach our website and get in touch with us.